Computer Tips From A Computer Guy |

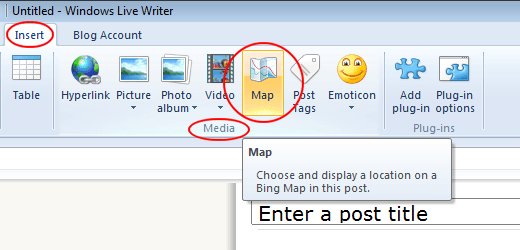
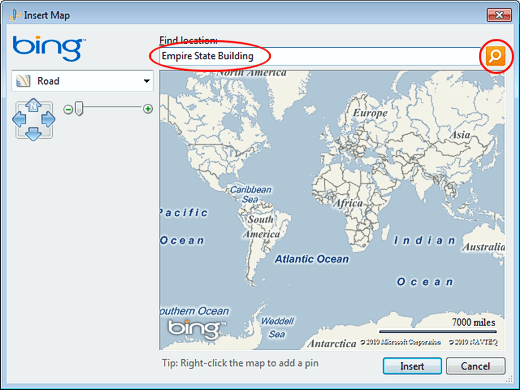
| Add a Bing Map to a Blog Post in Windows Live Writer Posted: 26 Nov 2010 04:50 AM PST The latest version of Windows Live Writer adds even more features to make posting to a blog that much easier. One feature of the application is the ability to add, with just the click of a button, a Microsoft Bing Map to a blog post. Learn how to add a Bing Map to your blog post and explore some of the reasons to do so in the first place. Adding Maps to a Blog PostWhether you run a blog as part of a business or use it to post your own personal rants about the world, eventually you’ll find yourself mentioning some location that can be found on a map. If you write a blog post about some great hangout or a place to get the best deals on LED TVs, why not show your readers where they can find it with a Bing Map? The maps you place in a blog post using Windows Live Writer are similar to the kind you find at Bing. It is not surprising that these applications work well together since both were developed by Microsoft. These maps allow your readers to view the map in standard Road and Aerial views. In some of the more populated areas of the world, Bird’s Eye view is also available. Adding a Bing Map in Windows Live WriterOpen up Windows Live Writer and click on the Insert tab on the Ribbon. Locate a section of the Ribbon labeled Media and click on the Map button. You should now be looking at the Insert Map window. Note that the default map shows the entire world. This is because you have to specify a location for Bing Maps to display. Locate the Find Location box and type in a location. Specific addresses need to be complete such as:
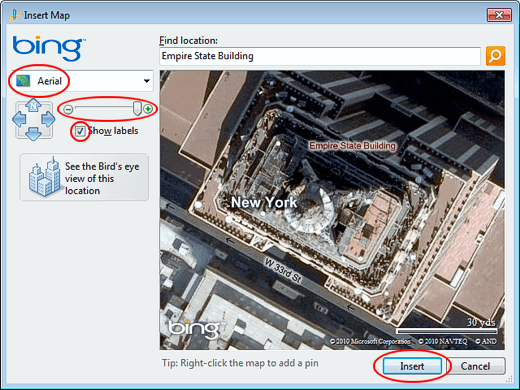
However, you can also specify well-known landmarks such as Grand Canyon or Empire State Building. For our example, let’s place a map of the Empire State Building in a blog post. Type the location in the Find Location box and click the Orange Button with the magnifying glass on it. You should notice that the application immediately shows the location of the Empire State Building in Road View. If you prefer either Aerial or Bird’s Eye view, choose it now from the drop down menu and then choose the elevation using the Slider. You can also choose to show any available labels by checking the Show Labels box. When you are done selecting the map’s options, click the Insert button and Windows Live Writer will insert your Bing Map directly into your blog post. Note that Windows Live Writer places the map into your blog post as a picture. This way, you can be sure that it will not change later when Bing updates the images in its database. Using a simple button, you can add custom Bing maps to your blog posts in Windows Live Writer. Lacking any other media, you can add a map to your post to break up text and offer some visual media to your readers. In addition, you can provide directions and help people find the things you are writing about in your blog.
Related postsCopyright © 2007 Online Tech Tips. Aseem Kishore (digitalfingerprint: a59a56dce36427d83e23b501579944fcakmk1980 (209.85.224.86) ) Post from: 
      |
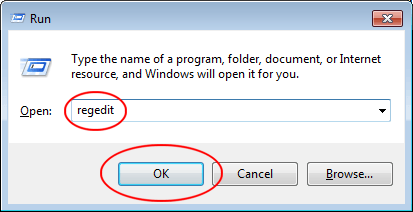
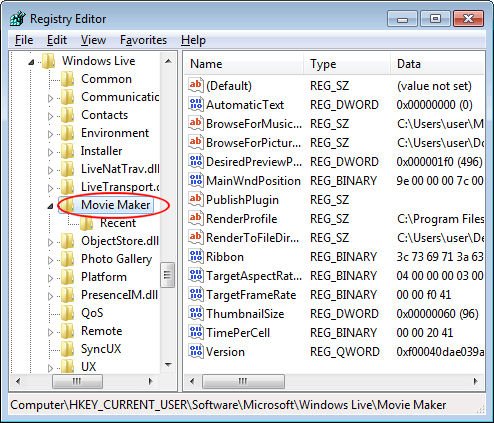
| Import Network Files into Windows Live Movie Maker Posted: 26 Nov 2010 03:08 AM PST Windows Live Movie Maker is the latest version of Microsoft’s free video editing software. Putting powerful editing tools in the hands of amateur editors, this application is a great choice for simple movie editing. However, Microsoft left one option off by default, perhaps for a good reason. By default, you cannot import files into Windows Live Movie Maker if the files reside on a networked drive. Learn how to edit a registry entry so you can import network files into Windows Live Movie Maker. The Problem with Movie Editing and Network FilesWindows Live Movie Maker project files are made of code that indicates where to place snippets of video and sound from multiple source files. Splicing parts of two video/audio files means that the application must keep track of where one snippet of the first file ends and the next begins. This is a problem if the source files reside on networks rather than locally on your PC’s hard drive. If your network is inaccessible, you will get error messages telling you that the source files you imported for your project cannot be reached. In this case, you cannot continue editing your movie until the networked files become reachable again. Microsoft, thinking that this would be too much for the average user of Windows Live Movie Maker, disallowed importing network files by default. Luckily, there is a way around this by editing a Registry entry. However, be careful. Editing the Registry can cause your PC to become unstable. Proceed at your own risk and only if you are comfortable editing the Windows Registry. Importing Network Files into Windows Live Movie MakerLog in to Windows using an account that has administrative privileges. Then, click on Start>Run. If the Run command does not appear on your Start menu, hold down the Windows key on your keyboard and press the R key. In the Run dialogue box, type in Regedit and click the OK button. Note that you may have to give Windows 7 administrative permission to run the Registry Editor You should now be looking at the Registry Editor application. In the left hand panel, locate the folder at:
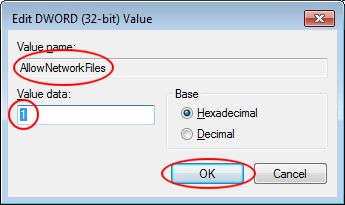
Right click on the Movie Maker folder and choose New>DWord (32-bit) Value. Name the new value:
Note that some of the letters in the DWord above are upper case and others are lower case. Be sure to type it in exactly as it appears above. Right click on the new DWord and select Modify from the menu. In the Value Data box, type in the number 1 and click the OK button. Restart your computer and you are now able to import network files into Windows Live Movie Maker. By default, Microsoft disabled the ability to import network files into Windows Live Movie Maker. With just a quick Registry edit, you can change this and begin using source files in your Movie Maker projects that are stored on a network. Just make sure you are comfortable making Registry edits or else find someone to help you.
Related postsCopyright © 2007 Online Tech Tips. Aseem Kishore (digitalfingerprint: a59a56dce36427d83e23b501579944fcakmk1980 (209.85.224.86) ) Post from: 
  |
| You are subscribed to email updates from Online Tech Tips To stop receiving these emails, you may unsubscribe now. | Email delivery powered by Google |
| Google Inc., 20 West Kinzie, Chicago IL USA 60610 | |
Tidak ada komentar:
Posting Komentar