Computer Tips From A Computer Guy |

| Transcribe, Store, and Share Voice Recordings Posted: 24 Nov 2010 03:52 AM PST Audio recordings are a communication medium often overlooked. But, these recordings are easy to make—most modern computers even have a built-in microphone—and quick to download. Plus, vocal recordings have the benefit of vocal inflection to show the tone of a message, which is something text-based communication cannot replicate. VoiceBase provides a home for voice recordings. Not only does it allow users to store and share recordings, it also transcribes them. Click the green Sign Up for Free button at the bottom right of the homepage. After a few routine signup questions, you are asked to confirm your email address before using the service. Once logged in, click the Upload Audio tab at the top of the screen to start uploading files. VoiceBase accepts virtually every kind of audio file, including WAV, MP3, AVI and AIFF. Click Browse and choose the file you wish to upload. The file size must be under 300 MB. On the next screen, click Save. Besides the free option, the dropdown menu on the right also has options for premium services, but these are unnecessary to use the service. You then receive a message stating your recording will be transcribed within 24 hours, but most likely ready in 2 hours. Besides being a place to uploading your own files, you can also search the public database of audio files. From the homepage, type your search query and click search. Results are displayed with markers indicating where the your keyword appears in the recording. VoiceBase limits storage space to two hours worth of audio files, after which users must pay for more time. This, and the general slowness of the Web site and transcription service, are our only complaints. It is a good service for storing and sharing audio files, but its two-hour limitation makes it unlikely to compete with completely free services.
Related postsCopyright © 2007 Online Tech Tips. Aseem Kishore (digitalfingerprint: a59a56dce36427d83e23b501579944fcakmk1980 (74.125.94.83) ) Post from: 
      |
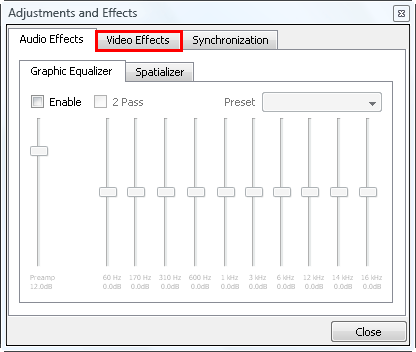
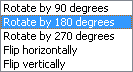
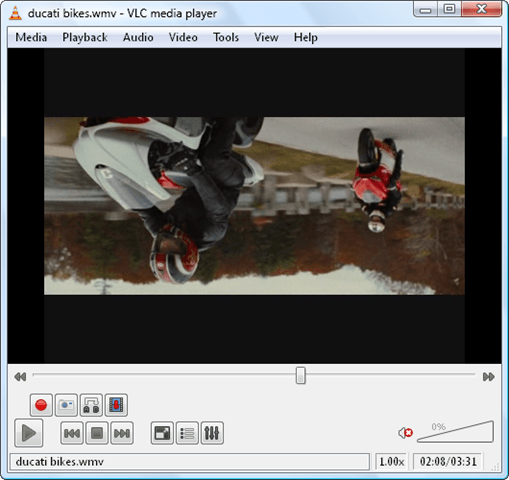
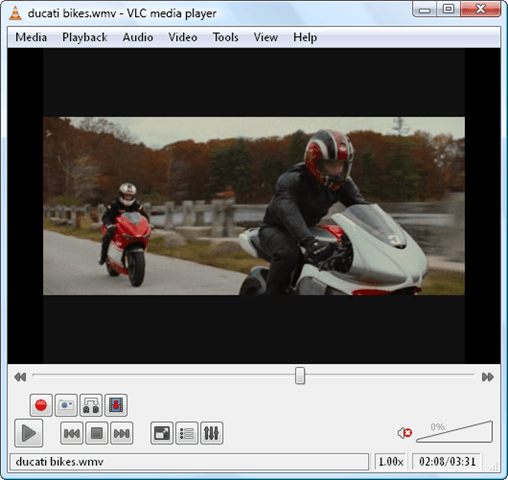
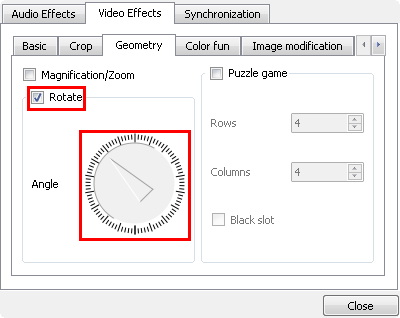
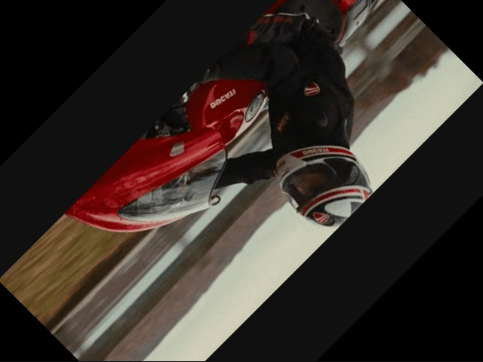
| Posted: 23 Nov 2010 04:32 AM PST Last week, we talked about how Windows Movie Maker can fix upside down videos. This time, we will try it with VLC, an open-source and free media player. The difference between the two platforms is that with the former, you have an option to create or publish the movie. The result or effect will be permanent. Once you play the file, it will have the rotated video. The latter, on the other hand, will fix the upside down video and play it immediately in the media player. Moreover, with VLC, you can use two methods for resolving this glitch. The first one is through the Transform feature and the other one is through Geometry-Rotate. If you plan to share the movie, edit its contents, upload it to YouTube or Facebook, or burn it to CD/ DVD, Windows Movie Maker is the better choice. However, if you're in a hurry and want to watch the video right away, it is recommended you fix the problem using VLC. To start, open the VLC program and click the Tools menu. Next, press Effects and Filters. The default display is Audio Effects. Hit the Video Effects tab to proceed to the next step. Under Video Effects, check the Transform checkbox. For this illustration, because we want to resolve the upside down video, we will select Rotate by 180 degrees. You also have an option to rotate the file by 90 or 270 degrees, or flip it horizontally or vertically. You will see the result immediately. This is the original video. This is the resolved movie. After the fix, you can continue playing and watching the video. The other way of patching up upside down video using VLC is through the Geometry-Rotate feature. To access this tool, you still have to click the same commands used in the first method. Go to Tools > Effects and Filters > Video Effects. Instead of going to Basic, browse to the Geometry tab. Next, check the Rotate checkbox. In here, you can see the Angle needle. This needle will be used to rotate the video according to your preferred angle. This is the default angle of the video when you enable Geometry's Rotate feature. Move the needle downwards to rotate the upside down movie by 180 degrees. You can see the effect in real-time. This is the result file rotated by the Angle's needle. Remember though that VLC's fix is not permanent. Once you close the file and play it again, you will still see the upside down video.
Related postsCopyright © 2007 Online Tech Tips. Aseem Kishore (digitalfingerprint: a59a56dce36427d83e23b501579944fcakmk1980 (74.125.94.83) ) Post from: 
  |


| You are subscribed to email updates from Online Tech Tips To stop receiving these emails, you may unsubscribe now. | Email delivery powered by Google |
| Google Inc., 20 West Kinzie, Chicago IL USA 60610 | |
Tidak ada komentar:
Posting Komentar